Monday, October 31, 2011

Harvest/Halloween Blog Hop with The Robin's Nest Design team


Welcome all! Halloween is my absolute FAVORITE holiday!

You should have come here from Terri Sproul's Blog, but if you get lost you can start at the beginning at the Robin's Nest Blog Chattering Robins, there is a complete list of blog hop participants at the bottom of this post.

THERE IS LOTS OF BLOG CANDY! Each blog will be giving away a $15 prize to shop at The Robin's Nest Store in addition to ONE GRAND PRIZE of a $50 Shopping Spree at the Robin's Nest Store! To enter the giveaway, you must:
1. Become a follower of all 11 participating blogs
2. Leave a comment on all 11 participating blogs

Winners will be announced on the Chattering Robins Blog.


Robin's Nest Supplies:
Glitter Black and White border swirl paper
Green Stencil on linen paper
Halloween Glitter Swirl Card stock
Gold Glitter letters
Brown on Brown Fleur-de-li card stock

Other Supplies:
The Best Glue Ever! -ScraPerfect
Perfect Cleaning Cloth -ScraPerfect
Butterscotch color wash -Ranger
Memory Mist Orange Juice -Stewart Superior
Gold fine art glitter
Ek Success corner punch
Black ink
Emaginations pine cone punch
sewing machine / red thread
fabric leaves, black card stock, green Sharpie marker

How to:
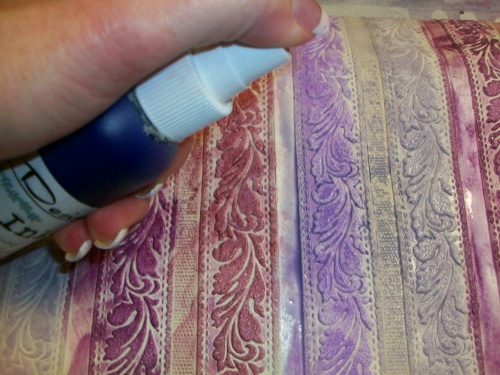
1. Spray the background paper with blotches of color wash and Memory Mist, let dry
2. Cut 1/4" strips of the Halloween Glitter Swirl Card stock, fold the strips and glue lightly to background along bottom and right border. Sew random waves of red through out and over them.
3. Crop and matte photos with Green Stencil on linen paper, ink the edges with black ink and place onto background paper.
4. Arrange title stickers onto black card stock and cut to size. Highlight letters with green Sharpie to cover any white areas. Cut ends into a "V" and use decorative corner punch. Glue into place and sew a straight line on inner edge.
5. Trace flourish border in random areas with The Best Glue Ever! Apply glitter, dump off excess, apply The Best Glue Ever to the area where your leaves will be placed and let dry. (glue remains tacky and will not soak through fabric leaves and flowers but adheres nicely) Adhere the leaves when dry. Use the Perfect Cleaning Cloth to remove static and excess glitter sticking outside the glue lines.
6. Punch pine cones from Brown on Brown Fleur-de-li card stock, and glue on top of fabric leaves.

Thanks for stopping by the blog!
Now HOP on over to Tenny Kusuma's Blog for more Halloween and Harvest delights!
HAPPY HALLOWEEN!

BLOG LIST:

Robin's Nest Blog - http://chatteringrobins.blogspot.com/

Terri Sproul blog - http://www.terrisproul.blogspot.com

Becky Conley: http://www.beckyconley.blogspot.com/

Tenny Kusuma: http://createwithtenny.blogspot.com/

Kristin Keller:http://scrappingmamahen.blogspot.com/

Michelle Cummings: http://faeriedustdreams-michelle.blogspot.com/

Irit Shalom: http://iritshalom.blogspot.com

Gini Cagle: http://www.ginicagle.blogspot.com/

Jan Hennings: http://papercraftpleasures.blogspot.com/

Clare Dempsey: http://www.cricutcraftyclare.blogspot.com/

Peg Round: http://www.pegscraftingcorner.blogspot.com/

Sunday, October 30, 2011

CLEARSNAP: "Joy" card


Hello! Welcome all inky crafty people! I'm so excited to be a Guest Designer this month on the Clearsnap Blog. I've enjoyed playing with these products and I hope you will too. This is my last post for my October guest spot, but I hope to be back soon.

I know you may "think" it's a bit early.............. but I'm feeling festive. I've been working on Christmas cards all year long. I love shiny things and shiny things most always land on my projects. These foils were the perfect touch.


CLEARSNAP SUPPLIES:
Glue Gloss
Fluid Chalk Ink Catseye: smoke blue, peacock, harbor, cerulean, royal blue and midnight.
Designer Foils: Goldmine & Holographic Stars
Stylus

OTHER SUPPLIES:
glossy white cardstock, purple rhinestones, Therm-o-web double sided Super Tape,
Tree stamp by Art Impressions, white embossing powder, Clear pigment pad, fine art glitter,
miscellaneous coordinating striped paper.

STEP 1: Trim your glossy cardstock to the size of your project. (4x5 3/4" for this card) Apply Fluid Chalk Ink directly to the glossy card stock with the catseye pad, creating blotches of color.


STEP 2: Continue adding blotches of color until your glossy cardstock is completely covered, use as many colors as you want, I used 6.


STEP 3: Use the Stylus to blend the colors into each other.


STEP 4: Heat set the background. Stamp the image with clear pigment pad and emboss with white embossing powder. Apply Glue Gloss over the entire background and sprinkle with fine art glitter, use more near the base to represent snow.

STEP 5: Hand cut letters and a star from double sided Super Tape and place onto project, apply Designer Foils. I used gold for the sentiment and holographic star on the star shape.


FINALLY: Mount the finished card front to a slightly larger card base of matching paper.

Thank you so much for stopping by the blog, become a follower and come back often for more inspiration and product information.

Cheers!
Becky Conley

Friday, October 28, 2011

Festive Friday Blog Hop

Hello and welcome to Festive Fridays Blog Hop!

We will be posting Christmas Cards on the 2nd and 4th Friday of each month (Except December)

Get your creativity going with lots of inspiration and ideas. Start now and make your holiday card list a pleasure to accomplish this December. ENJOY.

You should have come from Angela's Blog, be sure to visit all 16 of the blogs, use the Festive Image in my side bar or at the end of this post.


SUPPLIES: Papers: Flame Swirls and Stencil Green/Plum, Red glitter alpha stickers (Robin's Nest)
Lime green card stock
Bling leftovers (Grant Studios)
gold fine art glitter (Tulip)
Paper flowers by Making Memories
Cricut Trim the Tree cartridge
EK Success tag punch

I cut the tree and one shadow, glued the layers together and attached to the Flame Swirls background paper. Covered the star on top of the tree with glue then covered with glitter.
Bling was self adhesive, just peel and stick. Punch a tag and add alpha stickers, embellish with a paper poinsettia!

Thanks for hopping, click the image to go to Leslie Rahye's Blog.
Look for this image to hop, there is a complete list below, ENJOY.


Saturday, October 22, 2011

Duetica.com "Sweet Baby Jane" Scrapbook Page BLOG CANDY TOO


It's time to get artful with lettering! Duetica.com has an amazing Lettering Art Studio where you can create truly personalized and original projects with fonts.


This title was created with DT TinWhistle A00 and DT Piper F00 fonts.
I created an over-sized font in color, then layered the next font boldly in black.
Then I added a fun line of happy words within the stripes of papers.

All papers and embellishments are by Grant Studios.
For today's BLOG CANDY, I have two sets of these Grand Adhesions embellishments by Grace Taylor to give away.
Please post a comment on this entry and I will randomly select 2 winners.


Thank you for visiting, please become a follower......you'll be inspired and could win some candy!
Visit the Duetica.com Project Gallery for more creative lettering inspiration.

Scrap On!
Becky

Friday, October 21, 2011

SAKURA: Quick and Easy Charms!


Hello all and welcome!

Today I'm working on a charm bracelet or necklace that represents things I love and appreciate, the simple things in life. Creating personalized art is SO EASY with Sakura!


Supplies:
3d Crystal Lacquer-Color
White Brass Jewelry Findings
Shaped Brads!

Just fill in the base of the White Brass Jewelry Findings with your color choice of 3d Crystal Lacquer-Color, cut off the prongs of your favorite Brads and set them in! Viola! GORGEOUS, personalized charms!

Thanks for visiting the blog, become a follower!
Stop by the Sakura Hobby Crafts blog for lots of creative ideas and product info.
Cheers!
Becky

Thursday, October 20, 2011

CLEARSNAP: Artful Journal


Hello everyone! I'm very excited to be posting as a Guest Designer this month for Clearsnap!
I got a little inky creating this journal, I hope you enjoy it.

Clearsnap Supplies:
Colorbox Archival Pigment and Pearl ink Cat's Eye: Plum Berry, Violet, Heliotrope, Deep Grape, Dark Cherry
Holographic Stars Designer Foil
Glue Gloss

Other Supplies:
Textured wall paper, pre-bound journal, Purple acrylic paint, glass beads, wire, 2x3 stampbord, Star rubber stamp by Rubberstamp Romance, Gold embossing powder, heat tool, indigo walnut ink, Raspberry alcohol ink, dremel tool, scrap ribbon, Double sided super tape sheet, clear pigment pad, gold embossing powder, metal watch face.

HOW TO:

First, disassemble the journal to remove the front and back cover so you can decorate them.
Trim the wall paper to size just slightly larger than the book cover.

Add stripes of color to the textured wall paper by applying the pad directly to the paper. Cover the entire piece of paper.

Spritz with indigo tinted walnut ink. I made this spritz myself by boiling walnut ink powder and adding a bit of Rit indigo dye.

This step moves the ink around and lets it sink into the low spots.


Dab gently with a paper towel to remove puddles, let dry completely.

Once dry, use the ink pads again to lightly add a different color to high spots.
Heat set. Cover the book covers with the colored wall paper, double sided super tape sheets work best for this step, trim as necessary.

Paint the edges with acrylic paint, dry brush a little paint on to the wall paper.
Add more color with Colorbox Archival Ink Cat's Eyes, heat set. Coat the edges with Glue Gloss to seal the paint.


Pounce the background of the stampbord with Heliotrope Colorbox Archival Cat's Eye, then shade the edges with Violet Colorbox Archival Cat's Eye. Heat set.

Stamp the sun image onto the stampbord, and emboss with gold embossing powder. Color the watch face with alcohol ink, let dry and attach to the center of the sun image. Hand cut a small circle of Super Double-Sided sticky tape and attach to the center of the watch face, apply Designer Foil.

Twist wire around a bead and create a hanging ornament. Use a dremel tool or small drill to drill a hole through the stampbord in the lower left corner, attach the beaded wire to the stampbord either with wire or a scrap of ribbon. Glue the finished embellishment to the front of the journal.

Reassemble the finished journal, by reattaching the binding and pages.

Thanks so much for stopping by the blog! Become a follower, there's new inspiration and ideas with every post. Check out the Clearsnap Blog for more ideas!

Cheers!
Becky Conley

Wednesday, October 19, 2011

ScraPerfect! BTS Scrapbook Page BLOG CANDY


WELCOME! Fall is here! The kids are back to school and the leaves are changing.
This will be the last year I get to scrapbook about "BTS", next year, she's off to college!

I used a glossy card stock for the background, I have quite a few colors in my secret stash, and printing on them would be impossible if not for the Perfect Crafting Pouch. I'm also a huge fan of texture, fabric leaves and flowers and GLITTER! This layout has it all. I'm so happy that The Best Glue Ever! stays tacky after it dries, it's PERFECT (no pun intended) for applying fabric flowers, leaves and ribbon. It won't soak through the item and you don't have brads going through your layout that get caught up when trying to slip them into the album.

Use the Perfect Cleaning cloth to clear up any tacky areas that you don't want tacky and to eliminate static electricity when using glitter.

SUPPLIES:
The Perfect Crafting Pouch, The Best Glue Ever!, The Perfect Cleaning Cloth (ScraPerfect)
Autumn Stripes glossy card stock (Murdock Country Creations)
Computer, printer, .doc file (see below)
Gold embossing powder
red fine art glitter
fabric fall leaves
Baer paint chip
Dark Distressed Red card stock, gold glitter alphabet (The Robin's Nest)
Transparency film
Sewing Machine w/ Red thread
Plantin Schoolbook Cricut Cartridge (cut at 2 3/4" Bold)

First, I created a word processing document with a photo block and flourishes (image at the end of this post for your reference) and applied the Perfect Crafting Pouch to the glossy card stock before printing the document. **If you can adjust how much ink to use on your printer, lessen the ink output. When it's done printing, dump the embossing powder over the wet ink and heat emboss. Let cool completely. Apply the Perfect Crafting Pouch again over the embossed areas then add detailing w/ The Best Glue Ever! and apply the red glitter, dump excess and let dry completely before cleaning the layout with the Perfect Cleaning Cloth. Adhere photo in place, slip the paint chip behind the upper left corner of the photo. While you are waiting for the glittered glue to dry, you can apply some squiggles of glue below the photo at this time, so it will also be dry at the same time and you can place your leaves.

Cut the large BTS letters, the name is printed on transparency film, the dates are stickers.
Assemble the title block. Use a small amount of glue behind the letters on transparency, then sew lines with red thread horizontally to secure edges.

Thank you for stopping by the blog, I hope you enjoyed this project.
Please become a follower and be inspired with every post, and possibly win some blog candy :o)

TODAY'S BLOG CANDY!!!


LEAVE A COMMENT HERE FOR A CHANGE TO WIN ONE PERFECT CRAFTING POUCH!

Scrap On!
Becky

Below are more ScraPerfect products that will be given away on a other post.

Monday, October 17, 2011

Robin's Nest: Girly Scrapbook Page


Hello everyone! I'm very excited to welcome you to another Robin's Nest post.
I was in a scrapping mood so I created this fun layout.


Robin's Nest Supplies:
Little Girl Swirl Paper
Green Stencil printed on Linen card stock
Sunflower Dew Drops
Pink Glitter Flower
Yellow Glitter Butterfly
Glitter Gold Journaling block

Gold Glitter Card Stock Letters
Green Chipboard Leaf

Other Supplies:
Ribbon, tag and Raspberry Stickles, copper art wire

I used a paper saving technique to layer the background papers by cutting out 10" of the center so I would have the same paper to use as an accent in the lower right corner, which is trimmed to 6x6". The photo is glued only on the top and bottom so I could slide the tag behind it for journaling.

Dew drops accent the center of the glitter chipboard flower and stickles added some detailing to the glitter chipboard butterfly. I also coiled copper colored art wire to make the butterfly body.

Thanks so much for stopping by the blog! Become a follower and become inspired with every new post!

Don't forget to visit the Chattering Robin's Blog for more inspiration.

Have a wonderful and crafty day.
Becky Conley

Friday, October 14, 2011

Festive Friday Blog Hop

Hello and welcome to Festive Fridays Blog Hop!

We will be posting Christmas Cards on the 2nd and 4th Friday of each month (Except December)

Get your creativity going with lots of inspiration and ideas. Start now and make your holiday card list a pleasure to accomplish this December. ENJOY.

You should have come from Angela's Blog, be sure to visit all 16 of the blogs, use the Festive Image in my side bar or at the end of this post.


I've been a bit under the weather lately......so dealing with that and a lot of Dr. appts, I'm sharing another card I've received.

This gorgeous card was created by Your Maine Stamper.
There is a lot of stamping going on here! Great detail with colored pencil, cut outs, stamped background embossed with glitter, raffia bow and Snow Tex for the snow. The fence opens to reveal a sentiment.

Check out Your Maine Stamper.

All stamps by Your Maine Stamper, Winthrop, ME
#1077 Gated Fence
#1037 Fat Snowman
#1038 Thin Snowman
#1015 Holly & Berries
#1072 Wreath
#1025 Sm. Snowflake

Cloud Words

Thanks for hopping, click the image to go to Leslie Rahye's Blog.

Friday, October 7, 2011

Sakura: Sapphire Pendant


Hello! Welcome to another Sakura DT post. Today I'm sharing a pendant, it's quick and easy to assemble, but lots of drying time :o) and it's my FAVORITE color!

Supplies:
Blue Flash Gem Particles
Black Coated pendant blank (1 5/8 x 1 1/2")
1/2" High Quality Fancy Glass Tile
Clear 3d Crystal Lacquer
Black Pearl 3d Crystal Lacquer

I used the Black Pearl 3d Crystal Lacquer to adhere the 1/2" High Quality Fine Glass tile to the Black Coated pendant base. Then, I put a thin coat of Clear 3d Crystal Lacquer inside the base to give the Blue Flash Gem Particles something to stick to. I covered the entire remaining base with the Gem Particles and then covered them with Clear 3d Crystal Lacquer. The only thing I wish I'd done differently is turn the High Quality Fine Glass Tile 45 degrees, looks like I'm going to have to make another one!

The light catches the Blue Flash Gem Particles and it's just beautiful.
Thanks for stopping by the blog! Please visit the Sakura Design Blog for more project ideas and video tutorials.

Tuesday, October 4, 2011

Robin's Nest & VLVStamps: "Happy Halloween" Card


WITH VIVA LAS VEGAS STAMPS

Halloween is nearing and I'm getting pretty excited!
Creating projects for my favorite holiday has been so much easier this year with Robin's Nest gorgeous papers. Today, I'm sharing a "Happy Halloween" Card, created with Robin's Nest papers and 2 stamps from Viva Las Vegas Stamps.

Be sure to visit the Robin's Nest Blog and VSLS Blog for more ideas and inspiration.


Supplies:
3 Robin's Nest papers: Glitter Sepia Trees on Linen paper, Glitter Getaway Swirl paper, Glitter Orange Crackle paper
Viva Las Vegas Stamps: Flying Witch on Broom and Cat and Jack-O-Lantern
beige cardstock, Fabrico markers, black embossing powder with blue pearl pigment, Perfect Pedium pad, Palette ink pad: Burnt Sienna, 1" circle punch, scrap yellow paper, decorating chalks (ColorZ Chalks), label maker
, embossing tool.

I colored the Cat and Jack-O-Lantern image with markers, then huffed on it and stamped onto beige card stock and cut out. It is glued to a hand trimmed section of Glitter Getaway Swirl paper. The moon is a 1" circle punched from scrap yellow paper and glued onto the trimmed Glitter Sepia Trees on Linen paper. Then I stamped with Perfect Medium and embossed with black embossing powder mixed with blue pearl pigments and heat set. I added dark clouds to the sky with decorating chalks and inked the edges with Burnt Sienna ink pad. Add these layers to the card front base of Glitter Orange Crackle paper with inked edges. Punch the sentiment with a label maker and adhere as shown.

Thanks for stopping by the blog!
Happy Creating,
Becky

Sunday, October 2, 2011

WESTCOTT: Designer Crafts Connection Hop

Welcome to this month's Designer Crafts Connection Blog Hop!
This is a BIG hop with lots of project ideas and BLOG CANDY so be sure to visit all of the participating blogs. Use the DCC hop image on my left side bar.

WESTCOTT IS HAVING A HUGE GIVEAWAY TOO! SEE BELOW FOR DETAILS

WESTCOTT is the official sponsor of this hop, just look at all the goodies they sent!


Westcott Brand® Cutting Tools

Westcott Brand® Titanium Bonded Non Stick Scissors

Westcott Brand® 12” Titanium Bonded Trimmer


Be sure to visit the Westcott blog for lots of inspiration and tips, they are also very charitable and have charity auctions as well as donate directly from the company. If you "like" them on facebook you'll get the latest news.

The Westcott tools were PARAMOUNT in creating my project:
Hello Kitty Bag! The Self Healing Cutting Mat kept my project straight and I would not have been able to work with the Duck Tape without the Westcott Brand® Titanium Bonded Non Stick Scissors.

Other sponsors of this challenge were Duck Tape and Velcro.
Follow them on Facebook! Duck Tape - Velcro

The Duck Brand® Duct Tape Sheets

The Duck Brand® Patterned Duct Tape Rolls

VELCRO® Brand Hook and Loop Fasteners

VELCRO® Brand Sticky Back Hook and Loop Fasteners


This bag was primarily crafted from the sponsors products, chipboard base and Bling details.

First, I cut the chipboard pieces to be used as the base of the bag.
I began by attaching the closure strip to the front side and covering it with DuckTape on both sides.


Next, I covered the entire front side (8.5 x 12") with diagonal strips of DuckTape, leaving 1-2 inches hanging over each edge.


When the front was completed, I turned it over and attached the two side pieces and one of the base pieces. The bag is 8.5" tall so the side pieces are attached vertically.


I turned the project back over and covered the base piece with red duct tape.


Next, I covered the back side (2nd 8.5 x 12" piece of chipboard) with diagonal strips of DuckTape. Please note *the white pictured was replaced with pink zebra DuckTape.
I kept the strips about 2" longer on both sides to help with adhering the sides an bottom.

After I connected the sides and bottom into the bag shape, I covered the short sides with red DuckTape and attached the handle. The handle is constructed of three 12 x 2.5" strip of chipboard. I glued the center piece on top of the other two, overlapping 3 inches.


The handle is covered with DuckTape. It is attached to the inside of the bag approximately 4" below the rim. The "Hello Kitty" DuckTape on the handle started on the bottom of the bag and is one continuous strip around the entire bag and over the handle. The Hello Kitty DuckTape on the under side of the handle extends 4 inches past the chipboard to secure inside the bag.

I used a 1" strip of white Velcro on the top closure and created an eyeglass holder from a sheet of Plant Ties material. It is adhered to the corner of the bag with another strip of white Velcro.

I added some adhesive bling to the red stripes on the front of the bag.


I trimmed a sheet of zebra DuckTape sheet for the bottom panel inside but the rest is VERY PINK! Westcott also has a complete line of tools in pink in support of Breast Cancer Awareness and Fundraising.

ENTER TO WIN AN AMAZING Deluxe Assortment of Westcott Brand Cutting Tools before Nov 1st on the Westcott Facebook page. Please note that the prize must be shipped to a US address.

If you leave a comment here, on my blog, you could win this lovely scissors holster!


Thank you for hopping!
Live, Love and Create!