The challenge for the Robin's Nest design team call was to create something with paper! Oh la la, MY FAVORITE addiction! I posted 2 projects instead of just 1--I was having too much fun. Check out their website to see their gorgeous collections and visit their blog to see awesome projects and get the latest news! My favorites are the Oceanic and Wilshire Collections.
If you click the artwork images, you'll get a larger view.
My first project is a two-page 12x12 Scrapbook layout "In My Daughter's Eyes". There is a short video to show you some of the paper folding techniques I used to create the paper eye and flowers.


SUPPLIES:
All papers are from the Marjolaine collection by Basic Grey (wish I had some Robin's Nest papers!) Large Brad for flower is BG too, from an old collection.
Turquoise fine art glitter - Tulip
Say it with Pearls flourishes - Prima Marketing
The Best Glue ever! -ScraPerfect (also used the Crafting Pouch and cloth)
Weathered Wood distress ink -Ranger ink
Title Font -Bickley Script with Best Glue Ever and fine art glitter
The photo was done at the mall in a photo booth.
INSTRUCTIONS:
Pg 1: I trimmed an inch off 2 sides of the lighter background paper, inked the edges and centered it on to a darker paper. I practiced paper saving by cutting out the center of the darker paper and only using a 2" frame.
The title is printed directly to the background paper using a .doc file and staggered text blocks to follow the shape of the paper eye. I went over the printed title with glue and applied art glitter.
The "eye" was paper pieced and hand cut - please watch the video for paper folding techniques used. There is an element from the collection placed where the pupil is and other elements from the collection used to make horizontal lines and accent in top right corner. The "Say it with Pearls" just peels and sticks into place.
Pg2: The large stem is an element from the paper collection. I created the large blossom using paper folding similar to the circle on the "eye" which is explained in the video. There are two layers created from a 3" square and a 2 1/2" square, adhered with a large brad and fine art glitter near the center of the blossom.
I used the paper saved from Page 1 background to matte the photo. Then I used scraps from the collection to create the vertical accents and adhering them above and below the photo. Yes! They look like they are behind the photo right? Fooled you! Lastly, add the Say it with Pearls Flourish.
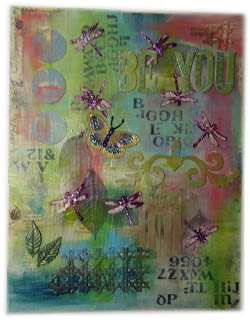
The second project is an 11 x 14 Mixed Media collage on canvas "BE YOU" that started with layers of scrapbook paper and book pages decoupaged to create the background. I also used left over rub on alphas, paper punched dragon flies, a stamped and embossed butterfly on cardstock, chipboard elements, clay leaves and skeleton leaves, an old piece of chair caning, punched canvas paper circles, paint, glazes, gel medium and stickles! Many of these items were in my scraps bucket as odds and ends.

Thank you for visiting the blog and letting me share my creations with you.
great projects, love the video... thanks for your submission for the Design Team for Robin's Nest
ReplyDeletei love the new collage!! very nice!! it's so nice to be getting inspiration from you again!!
ReplyDeleteFabulous project, Becky!! Good luck with your submission :0)
ReplyDeleteawwww, Thank you Ladies! :o)
ReplyDeleteLove your mixed media piece - it rocks!
ReplyDeleteGini
This comment has been removed by the author.
ReplyDeleteBeautiful layout....Love this. TFS.
ReplyDeleteHugs -- Tenny