Showing posts with label sakura. Show all posts

Monday, May 7, 2012

Designer Crafts Connection: Quick nEZ Jewelry

Welcome to the Designer Crafts Connection Blog Hop!
We are a group of Designers banned together for themed postings for hopping on the first Monday of each month. This month, we are sharing projects for Quick n EZ Jewelry.

Please click the image to be taken to the directions for each project.


POSTAGE STAMP UNDER GLASS / DUCK TAPE AND METAL EMBELLISHMENTS


PENDANT BLANKS, BLING AND MINI BRADS!


SOMETHING OLD IS NEW: COLORING METAL

Use the DCC HOP button/logo on my left side bar to hop to the next blogger for more ideas and inspiration. There is also a list below.

Craft on!
Becky
100 Directions
365 days of crafts
Ana's Creative Chaos
Art in Entertaining
BC Designs
Beadphoria Blog
Beth Watson Design Studio
Brenda Pinnick ColorCafe
Bzzy Little Bee
Candice Windham Designs
Carol Heppner's Studio
Cindy Rippe's Florals, Family and Faith
Cool2Craft
CraftyChica.com
Creativity Stirs the Soul
Debra Quartermain
Eileen Hull- thoughts from my studio
Faerie Dust Dreams
Fat Cat Creations
Hydrangea Hippo
It's Sew Lorine
JGoode Designs
Jill MacKay
Just a thought Or Two
katydiddys
Ken Oliver's World in Progress
Kid Giddy
Life in the Craft Lane
Life Snippets
Live a life Handmade
Megpie Designs
Mel Designs
Memoirs of a Modern Surrealist
Positively Me by Julianna Hudgins
Roxi's Creative Juice
Sandy Laipply
Scrappin' it
ScrappinCricut
Serendipity
Something Created Everyday
Something to Cherish
Stampin' Queen Creations
Sue's Creative Workshop
T'art
Terresscraptherapy
Terry Ricioli Designs
The Creative Goddess
Theresa Cifali: This Artist's View

Monday, March 12, 2012

Perfect Printing (& Stamping) on Canvas


Supplies:
The Perfect Crafting Pouch
The Perfect Cleaning Cloth
9 x 12" Lyons Standard Artist Canvas
Inkjet printer, your photo
3d Crystal Lacquer: Color, Metallic and Pearl
Stickles- Ranger Ink
Butterfly Lady Stamp- VivaLasVegasStamps!
Stazon Ink-Black

1. First, treat the entire canvas with a gentle wipe of the Perfect Crafting Pouch to optimize color quality.
2. Print the photo and let dry over night.
3. Lightly rub the area where you will stamp your image with the Perfect Crafting Pouch. Stamp and let dry or heat set.
4. Gently remove any residue around the stamped image with the Perfect Cleaning Cloth if necessary.
4. Color the stamped design with Sakura 3d Crystal Lacquers: available in clear, colors, metallic and glitter colors and Stickles (by Ranger Ink)
5. Let dry completely, frame and Viola!


Thank you for stopping by the BC Designs blog today. Please visit often for more project ideas and inspiration. The Scraperfect Blog also has lots of project ideas and the website is full of helpful tutorials.

Link

Friday, February 17, 2012

SAKURA: A Nautical Fixhttp://www.blogger.com/img/blank.gif


Welcome crafty peeps! This is my last post with the Sakura Team, (sad face) it has been creatively fun! I'm just too busy to continue (Happy Dance!)
The new team will be announced on February 19th, on the Sakura Hobby Crafts blog.

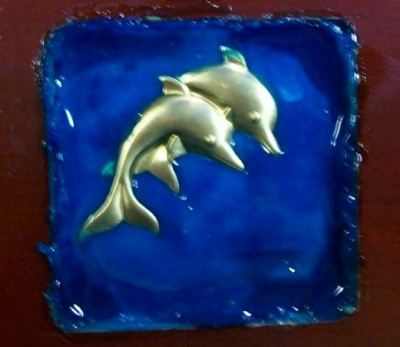
Today I've created a "nautical fix" to a keepsake box. There was a clock in the front, but it arrived damaged and had fallen out of it's socket. It is also supposed to be a memory keepsake with an area in the lid for a photo or small artful image, but I turned it into a pin cushion.

SAKURA SUPPLIES:
3d Color Crystal Lacquer -Blue
3d Color Crystal Lacquer -Sky Blue
3d Color Crystal Lacquer -Glitter Aqua
3d Clear Crystal Lacquer
Gem Particles -Blue Flash

Other Supplies:
Wood memory box, hot glue, fabric batting, broken watch part, brass dolphin charm, small piece of chipboard.


The clock was square, therefore so was the hold it left in the box. It was quite deep so I filled it about half full with hot glue before adding a layer of 3d Color Crystal Lacquer -Blue and 3d Color Crystal Lacquer -Sky Blue. When that was completely dry, I added a thin layer of 3d Color Crystal Lacquer -Glitter Aqua and let it set for about 15 minutes before setting the charm on top.


After this step was completely dry, I added a layer of 3d Clear Crystal Lacquer.
I also used 3d Clear Crystal Lacquer to adhere the metal circle which is part of a broken wrist watch face and the Gem Particles -Blue Flash around the edge.


The pin cushion is chipboard with 2 layers of batting covered in fabric and inserted into the photo area of the lid.


Thank you so much for stopping by to share my project! Please jump over to the Sakura Hobby Crafts blog for more projects and inspiration.

Please stop by the Sakura Hobby Crafts blog on February 19th to meet the new team!

Becky

Friday, February 3, 2012

SAKURA: Fun Jewelry


Woohoo! Back from CHA! Today, I've created some fun jewelry pieces with a few of the NEW Sakura products. I'm loving the new bales, findings and chains.

WILD CAT PENDANT NECKLACE:


SAKURA SUPPLIES:
Silver-tone Heart Bale
Silver Plated Ball Chain Necklace
Rectangular High Quality Glass Pendant
3D Crystal Lacquer -Clear

Other supplies: Postage stamp

Directions: Apply a thin coat of 3D Clear Crystal Lacquer to the back side of the Rectangular High Quality Glass Pendant and place on top of the image on the postage stamp. Let dry completely and trim. Brush a thin coat of 3D Clear Crystal Lacquer along the back side of the paper to seal it, let dry. Use a small drop of 3D Clear Crystal Lacquer to attach the Silver-tone Heart Bale to the front of the Rectangular High Quality Glass Pendant. Viola!

CUFF BRACELET


SAKURA SUPPLIES:
Antique Brass and Copper SteamPunk elements : Jewelry Findings

Other supplies:
Duck Tape: gold metallic, cheetah, black
Black Velcro

Directions: Start with a strip of black Duck Tape, then add strips and triangles of gold metallic and edge with the cheetah. Assemble and affix the Antique Brass and Copper SteamPunk Jewelry Findings. Finish with black Duck Tape on the inside to cover the mini brads from the embellishments. Affix Velcro to the ends.

Thank you for stopping by the BC Designs Blog! Please stop by the Sakura Hobby Crafts blog for more project ideas and inspiration!

Craft on!
Becky

Thursday, January 26, 2012

CHA: Tooting Horns

I'm very excited, (and flattered) that the amazing Terri Sproul used two of my projects on her Mixer Promo Sign for her new line of Sakura Products! The Genie Bottle and the set of 3 charms are mine! woohoo! :o)

DOUBLE TOOTS!!


Please visit my Designer Showcase TABLE #5 while at CHA.

Monday, January 30, 2012
10am-6pm - Showcase Viewing for CHA Attendees (Includes: Retailers, Editors, Publishers and Manufacturers) - Designers not present
6pm - 8pm - Designer Spotlight Event - Meet and Greet PLUS Showcase (Viewing for all registered CHA Attendees) - Designers present
Tuesday, January 31, 2012
10am-6pm - Showcase Viewing for CHA Attendees (Includes: Retailers, Editors, Publishers and Manufacturers) - Designers not present

Stop by CHA Booth #844 to visit with Terri and see all of the glorious Metallic Terri Sproul Mixers (powder pigments).

Craft on!
Becky

Friday, December 16, 2011

SAKURA: Artcover for Journal


Hello!! Welcome to my bi-weekly Sakura post. This week I created two embellishments to adorn my latest artfully covered composition book.

SAKURA SUPPLIES:
Oriental Paper (coming soon!)
3d Color Crystal Lacquer
3d Pearl Crystal Lacquer
Peacock Green Gem Particles

Other supplies:
Composition notebook
large postage stamp
Outline Sticker-Sparkraft Enterprises, Inc
Black & White Card stock
Cricut: Rock Princess cartridge
sheet of double-sided super sticky tape (Therm-o-Web)


The butterfly was cut from black cardstock at 3.5" in two layers and brushed with 3d Pearl Crystal Lacquer in blue and gold. While it was still wet, I rubbed the gold layer through the Gem Particles then let dry. Then I assembled the wings and added more details with 3d Colored Crystal Lacquer and 3d Pearl Crystal Lacquer. I added dimension to the body with black 3d Colored Crystal Lacquer.


I applied the sticker to white card stock, then colored in the open areas with 3d Color Crystal Lacquer and 3d Pearl Crystal Lacquer. When it was completely dry, I trimmed it to the size of the sticker.


I put a sheet of super sticky tape on the entire cover of the composition book to apply the decorative Japanese paper, roll with a brayer to get any air bubbles out and to assure good adherence and trimmed the edges. Merely embellish the cover with artful elements.

Thanks so much for stopping by the blog, please become a follower to receive updates and notices for new projects posted.

Be sure to stop by the Sakura Blog for more great project ideas.

Cheers!

Friday, October 21, 2011

SAKURA: Quick and Easy Charms!


Hello all and welcome!

Today I'm working on a charm bracelet or necklace that represents things I love and appreciate, the simple things in life. Creating personalized art is SO EASY with Sakura!


Supplies:
3d Crystal Lacquer-Color
White Brass Jewelry Findings
Shaped Brads!

Just fill in the base of the White Brass Jewelry Findings with your color choice of 3d Crystal Lacquer-Color, cut off the prongs of your favorite Brads and set them in! Viola! GORGEOUS, personalized charms!

Thanks for visiting the blog, become a follower!
Stop by the Sakura Hobby Crafts blog for lots of creative ideas and product info.
Cheers!
Becky

Wednesday, August 10, 2011

Sakura Design Team Post & Blog Candy!


Today I am posting the project I made for my Design Team Application to Sakura.
Visit their blog for helpful tips and project ideas

FLOWER SHAPED CARD

SUPPLIES: I am being a bit generic about the products used here because most of them are scraps of left overs, I went through the scrap paper bin and picked 4 blue hues that worked together and one green piece for the leaves. The brad is a Basic Gray left over.
*Sakura-3D Clear Crystal Lacquer
*Spellbinders dies-Daisy Heads, Flower Creations, S3 die of 3 hearts, bee/hornet and grass hopper.
*Kaiser Craft wood flourish
*Ink- Adirondak:Stream, Meadow, Citrus, Lamp Black-Ranger
*Copper Wire, dimensional foam adhesive, liquid glue, sand paper, scissors, blue fine art glitter
*Flower shaped card-Darice
*Rubber Stamps - Flourishes BY ME! BCDesigns (BLOG CANDY! leave a comment on this post to be eligible to win the entire 8x10 sheet of high quality red rubber images: see below) Find them at HeartsinTouch.com

I started with a blank white shaped card.

Then covered it with patterned paper and stamped flourish accents in coordinating ink colors.

Then I cut and embossed 6 large die cut hearts from glossy cardstock, sanded the raised areas and inked them with Adirondak Stream. I cut off the bottom points and folded them backward at the center and glued them on top of the flower card as shown. I picked 3 flower die cuts by sizes that would work, sanded and inked them too. Assemble the three smaller die cuts with the decorate brad in the center.

Adhere the smaller flowers with 2 layers of dimensional foam adhesive in the center of the large flower. Ink the wood flourish with Citrus and glue in place on top of leaves. The grasshopper is inked with Meadow, the bee with Lamp Black. Use liquid glue to hold the copper wire at the center of the flower and dry adhesive to adhere the wire to the backside of the bee.

I applied 3D clear crystal lacquer to accent the edges of the large flower petals, raised areas of all die cuts-including the bee and grasshopper, and the stamped areas on the leaves. This step adds SO MUCH in the way of dimension and shine.

Since I can't seem to live without bling these days, I sprinkled a very light amount of blue art glitter over the flower while the crystal lacquer was still wet.


BLOG CANDY!
You can win this entire sheet of flourish designs in high quality red rubber stamps!
Just leave a comment on this post and a random winner will be selected. Of course, I'd appreciate it if you follow my blog too! (but only if you enjoyed this project as much as I did creating it :o)

If you are not the lucky winner, but LOVE these designs I've created, they may be purchased at HeartsinTouch.com for $16. Check out her shipping options.

Adhesive foam is not included in this give away.

Stay Crafty & Be You!
Becky