Tuesday, September 25, 2012

Happy Halloween with Purple Cows and Duetica.com


It's time to start decorating for Halloween!  


FONT USED: DT TIN WHISTLE A00 (bold 150 pt)


13" Hot and Cold Laminator  #3027
Hot Pockets Letter 8.5 x 11 #4080
2 in 1 Combo Trimmer #1040
Melt Dual Temp Craft Iron with 6 tips #5000
Gem Setting Kit #5071
Wind it #7100
Wind it Wire #7103 Silver

Other Supplies: card stock (white), patterned paper (My Mind's Eye Halloween Scary Sparkles), specialty paper, (Silver Shimmer, Petallics by Worldwin Paper), 6 black eyelets and tool kit, Clear jewelry twine or fishing line, Corner rounder punch, purple stickles (Ranger Ink), PC and printer, Krylon satin black spray paint, craft knife, super sticky tape.

Directions:
1. Use the duetica.com Lettering Art Studio to create a document to print onto decorative paper.  Print and trim to size (about 4" x 8").
2. Round corners and add stickles to the printed font.  Let dry completely.
3. Laminate and trim.  Add the eyelet to the top center of the project.
4. Print the silhouette images onto white card stock and cut out.  You don't have to be too precise because you're going to spray paint both sides.  Do this next and let dry completely.

5. Pencil sketch a web form onto the silver shimmer paper (half sheet) with a pencil and ruler, then cut out with a craft knife.
6. Attach the web behind the header (printed font block) with super sticky tape and adhere the spider to the web.
7. The bat is attached to the header using eyelets and invisible string.
8. Using the Heat It tool and Gem setting kit (tiny red gems) heat set "eyes" onto each silhouette.

9. Use silver wire and the Wind It! tool to create fancy hangers for your holiday decorations!


 Thanks for stopping by!   I'll be posting more Halloween and Autumn decor ideas in the following weeks.
Craft on!
Becky

Friday, September 21, 2012

Altered Arts Magazine: Repurposing


Fall is in the air! Today I'm repurposing an old fabric swatch book.
Of course, I have found many uses for the lovely fabric it once held: Scrapbook embellishments, collage, quilts, applique and more. The books themselves are so durable, there is much more life to them.

Ideas:
(1) This note pad, decorated for fall but can easily be refilled and the flower changed time after time. (instructions below)
(2) Decorate the top/front, spray the long area with chalk board paint and add a little chalk holder.
(3) Decorate the long writing area around the border only, then cover it with laminate to use as a dry erase board, attach a marker on a string at the top.


Supplies:
Decorative paper (Jeanine DeOre digi kit "William")
Fabric Flower
Ribbon
lined note pad
3/8" and Super Sticky sheets adhesive
Liquid glue or hot glue

Directions:
1. Disassemble the fabric book and remove the fabric swatches.
2. Untie the hanger that came with the book by unknotting it inside the cover or snipping off as little as possible to remove it for the next step.
3. Cut decorative paper to fit the panels on the cover and adhere with super sticky sheet. I used one piece to cover the front and top, making it about 1" longer than needed so I could over lap the large panel on the back side.
4. Pierce the holes where the chord hanger was and put the handle back into place.
5. Cut a lined pad of paper to size and adhere inside using super sticky sheet adhesive.
6. Wrap the ribbon all the way around the project, meeting on the front side under where the flower will be placed. Adhere with 3/8 super sticky tape.
7. Glue the fabric flower into place with strong liquid glue or hot glue.

Thanks for stopping by!
Please follow Altered Arts Magazine on Facebook to see many more project ideas and inspiration.

Cheers!Link
Becky

Friday, September 7, 2012

Altered Arts Magazine: Domino Pendant


I'm altering dominoes into jewelry, what fun!

Supplies:
1 domino
spray paint
Creative Imaginations Sticky Naturals
Perfect Pearl pigment powders (Ranger Ink)
silver "outlines" stickers-nautical
Silver heart bale and 3d Crystal Lacquer by Sakura
Krylon Silver metallic pen

Directions:
1. Spray paint the domino on the back side, let dry.
2. Cut the Sticky Naturals to size and place onto the surface.
3. Brush with Perfect Pearls pigment powders (at least 2 colors)
4. Color the sides of the domino with the Krylon Silver metallic pen.
5. Attach the silver fish from the "outlines" sticker sheet.
6. Adhere the heart bale with 3d Crystal Lacquer.


Thanks for swinging in for some altering fun!
You can also "like" Altered Arts Magazine on Facebook where all the designers share project ideas and design tips.

Make Art Everyday!
Becky

Monday, September 3, 2012

Designer Crafts Connection Blog Hop!

Welcome to the September Designer Crafts Connection BLOG HOP.
We are a diverse group of Craft Industry Designers, sharing our creativity through hopping.
We hop on the FIRST MONDAY of each month. This month we are also having a manufacturers challenge and give away, details below.
To visit the next blog, please use the DCC Hop Button at the end of this post or on my sidebar.

This month, our theme is "vintage" which made me think of some of my favorite past-times that I enjoy while relaxing with television late at night: stitching! I mostly cross stitch and enjoy Japanese Bunka Embroidery too. So, stay with me here! LOL I also thought of a crafty hobby I used to enjoy as a child. Do you remember "string art"? Pounding nails into boards to create a shape and then winding yarn or string? So that is where I landed :o)

STRING ART ON CARD STOCK
THANK YOU KREINIK FOR THE LOVELY THREADS!

I have some old string art books from the 70's, the patterns are large so they need to be photo copied and reduced. Then print them onto card stock, select your thread colors, get comfy and stitch away! This piece is about 6x6".

Crafty KT is sponsoring The KOOL TAK™ Manufacturer Challenge: Fabulously-Fall Blog Hop.
September 8 to September 18Join us and visit the blogs of 12 professional and creative craft designers as they show you how to create some great fall projects with Kool Tak™ products.
Make sure to enter the The Kool Tak™ giveaway, which is valued at about $70.00
Kool Tak™ 1 Layer Perfect (Use it for centering, piercing, and edge stitching) Tool
Kool Tak™ 1 Shiny Transfer Foil Sheets (Earth Tones)
Kool Tak™ Clear Foam tape ¼ x ¼ x 1/32” thick
Kool Tak™ Clear Foam tape 3/16 x 1/16 thick by 1.6 yards
Kool Tak™ Premium EXTREME 2 ½ x 27 yards

We will choose one lucky giveaway winner from those who sign up for our newsletter. You only need to enter once.
Only those with a mainland USA shipping address are eligible to win the giveaway.

Now, hop on the next designer blog!
Craft on!
Becky

Sunday, August 26, 2012

Scrapbooking with Duetica.com Lettering Arts Studio


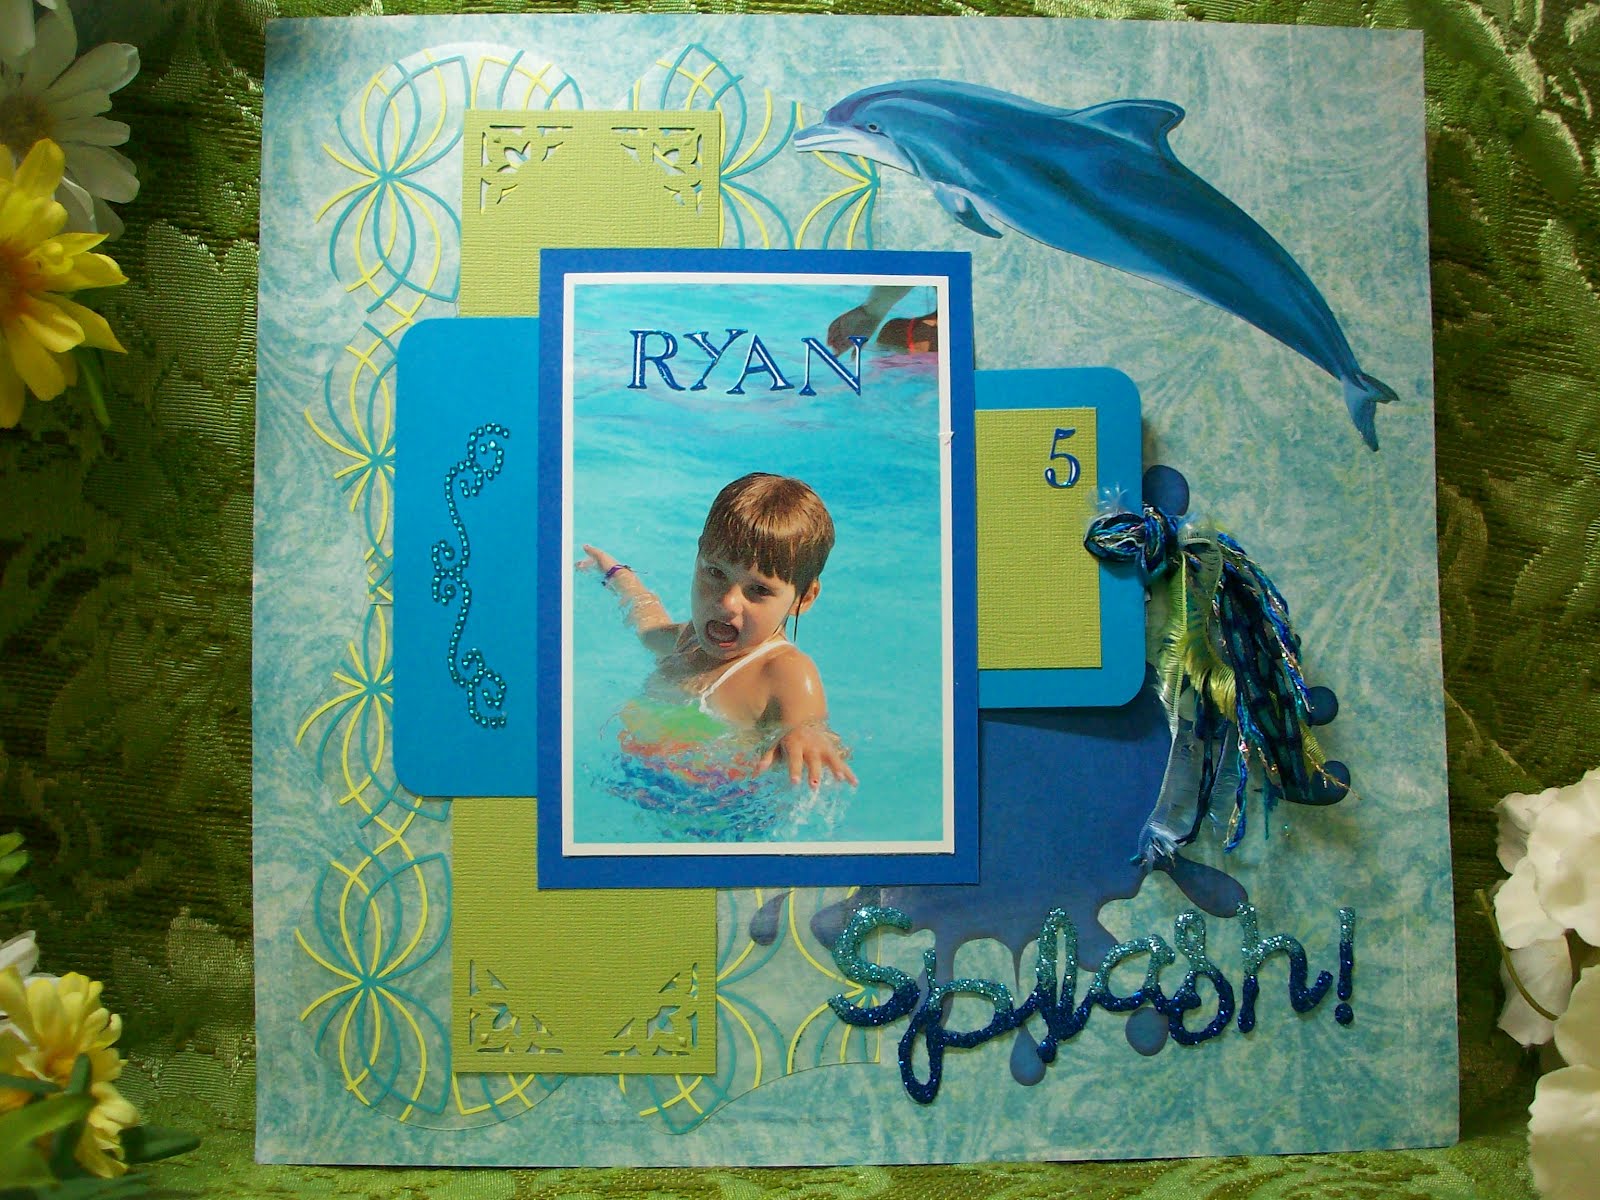
It's easy to personalize titles for your treasured scrapbook pages with duetica.com's Lettering Arts Studio. I was playing with the "outline" feature on their Studio. This layout of my grand daughter on our recent trip to Funtown/Splashtown in Saco, Maine captures her energy and the fun of our day.


DUETICA FONTS: DT Floot B10 (72pt-Bold)

Other Supplies:
KI Memories Sheer Delights Lotus 2 (half sheet)
Fancy Pants paper Stained Stripes (back side)
Cardstock: turquoise, dark blue and lime
Corner Punch-Purple Cows, Inc Autumn
Perfect Crafting Pouch and Perfect Cleaning Cloth by ScraPerfect
Wallies-dolphin
turquoise bling by Want 2 Scrap
blue glitter alpha stickers - Robin's Nest.
Fine art glitter (teal and dark blue), misc. fibers and corner rounding punch.

DIRECTIONS:

1. Cut the Sheer Delight and attach to the background paper, over lapping slightly as shown.
2. Prepare the area to be printed with the Perfect Crafting Pouch (This helps the ink dry faster, especially on the slick transparency surface)
3. Print a large blue "Splash" onto the background. Heat set or dab with the Perfect Crafting pouch if needed.


** on a side note: I wanted to mention that while you are designing in the Lettering Arts Studio, all the fonts on your PC will be available to use in your design!


4. Enter the Lettering Arts Studio and create your design.
5. Click "Create Image Copy", select "Outline" and save the file to your PC.
6. You can open the file and print or insert the file into another document, as I did to play around with placement.


7. Be sure to check your printer settings, especially for photo printers to turn off the "glossy".


8. Print the text directly onto background paper.


9. Swipe the Perfect Crafting Pouch over the printed word (this will reduce static when using glitter) and apply glue within the lines of the printed text.


10. Cover the glue with 2 colors of fine art glitter.


11. Dump off excess glitter and let dry. Remove any Perfect Crafting Pouch residue with the Perfect Cleaning Cloth.
12. Cut 10" x 2.5" lime card stock and punch the corners, adhere along the left as shown.
13. Cut two 3.5 x 5 pieces of turquoise card stock and round corners. One will go behind the photo on the right vertically, the other will be used as a tag behind the photo, add a small scrap of lime card stock to accent and lift the tag.
14. Mat the photo with dark blue card stock and adhere using adhesive on the top, bottom and left sides only, to create a pocket for the tag.
15. Finish the tag with fibers, add the alpha glitter stickers, bling accent on the left and the dolphin Wallie.


Thanks for stopping by the blog today! I hope your summer has been fabulous. Come back Friday, I'll be scrapping again with the duetica.com Lettering Arts Studio.

Becky