Showing posts with label fall. Show all posts

Saturday, September 21, 2019

Falling for Handmade Paper Blog Hop!

Welcome to my stop on the Falling for Handmade Paper blog hop! Today we have a dozen talented bloggers sharing projects featuring handmade paper paired with Club Scrap's Falling Leaves collection.

Supplies:
Club Scrap Falling Leaves Kit:  Beige textured 12x12 Paper, brown paper with metallic leaves, Leaf stamps, Brown ribbon with gold edges, solid brown cardstock,
Palette inks: Landscape, Haystack, Moulin Rouge, red mini-brad, a real Maine oak leaf, computer, adhesives and cutting tools.
Instructions:
1. Create a 12x12 document on your PC for the title, print directly onto background paper.  
2. Cut 4" x 12" piece of the brown paper with metallic leaves, adhere to the bottom of the background paper.
3. Use a dry adhesive like tape runner to adhere the ribbon where the two papers meet, wrap edges around the back.
4. Mat the photo on brown cardstock (the sheets that come in the Club Scrap Kit are the perfect size to mat a 4x6" photo!) Attach the photo with adhesive on 3 sides only, to create a pocket for the journaling tag.
5. Cut a rectangle of hand made green paper approx 3" x 5", use a corner rounding punch on the top two corners, attach a 3" piece of ribbon at the top with a red mini-brad. Ink the edges of the tag (Palette-Landscape)
6. Cut an apple shape from hand made red paper, ink edges with Palette Moulin Rouge. Cut a little stem from brown paper. Ink a skeleton leaf with Palette Landscape. Assemble and adhere to the page.
7. Rub stamp pad directly to the edges of the background paper. (Palette Landscape) Stamp falling leaves in 2 shades of green.
8. Use liquid glue to adhere the leaf.

Lisa Dolezal at Rockin Paper Scissors and Glue is your next stop. As you explore the hop today, we encourage you to leave each blogger a few kind words in the form of a comment. Those who leave a comment on every participating blog will be entered into a random drawing for a prize. Good luck!

Thursday, October 4, 2012

Autumn Centerpiece with Purple Cows, Inc


Autumn in the air, the Maine foliage is becoming brilliant and the air is cool even under the shine of the sun. Today I've brought the brilliance of fall into my home wit this table centerpiece.

PURPLE COWS SUPPLIES:
13" Hot and Cold Laminator  #3027

OTHER SUPPLIES:
Branches and leaves gathered from outside, faux berry sprigs and glittery curly Qs, small scissors, ribbon, glass container, rocks, and hot glue gun. 

DIRECTIONS:
1. Gather branches and leaves.
2. Arrange rocks and branches in the glass container, add the sprig of faux berries and glitter curls.
3.  Place leaves inside (2) 12" x 12" laminating sheets and laminate. 

 
4. Cut out the laminated leaves, leaving approximately 1/8" to 1/4" around the edges. 
5. Hot glue the leaves to the branches using one small dab of glue near the base of the stem.
6. Use the Pin It!  #7000  to attach 2 copper leaves from the Pin It! Pin Set-Laurel Leaf #7008 to the ribbon and tie the ribbon into a bow around the glass container.

*NOTES:  
1. I did not dry and press the leaves before laminating them.
2.  I used to think laminating was expensive, but looking at the Purple Cows website to create the links for this post, I saw the generous amount of laminating sheets in each pack with such a reasonable price, I am thrilled!  I'll be laminating much more :o)

Thanks so much for stopping by the blog, please visit the Purple Cows, Inc BLOG for more great project ideas and watch some MOO TUBE to view tutorials and see how easy it is to create with their tools. 

Craft on!
Becky
 

Friday, September 21, 2012

Altered Arts Magazine: Repurposing


Fall is in the air! Today I'm repurposing an old fabric swatch book.
Of course, I have found many uses for the lovely fabric it once held: Scrapbook embellishments, collage, quilts, applique and more. The books themselves are so durable, there is much more life to them.

Ideas:
(1) This note pad, decorated for fall but can easily be refilled and the flower changed time after time. (instructions below)
(2) Decorate the top/front, spray the long area with chalk board paint and add a little chalk holder.
(3) Decorate the long writing area around the border only, then cover it with laminate to use as a dry erase board, attach a marker on a string at the top.


Supplies:
Decorative paper (Jeanine DeOre digi kit "William")
Fabric Flower
Ribbon
lined note pad
3/8" and Super Sticky sheets adhesive
Liquid glue or hot glue

Directions:
1. Disassemble the fabric book and remove the fabric swatches.
2. Untie the hanger that came with the book by unknotting it inside the cover or snipping off as little as possible to remove it for the next step.
3. Cut decorative paper to fit the panels on the cover and adhere with super sticky sheet. I used one piece to cover the front and top, making it about 1" longer than needed so I could over lap the large panel on the back side.
4. Pierce the holes where the chord hanger was and put the handle back into place.
5. Cut a lined pad of paper to size and adhere inside using super sticky sheet adhesive.
6. Wrap the ribbon all the way around the project, meeting on the front side under where the flower will be placed. Adhere with 3/8 super sticky tape.
7. Glue the fabric flower into place with strong liquid glue or hot glue.

Thanks for stopping by!
Please follow Altered Arts Magazine on Facebook to see many more project ideas and inspiration.

Cheers!Link
Becky

Wednesday, October 19, 2011

ScraPerfect! BTS Scrapbook Page BLOG CANDY


WELCOME! Fall is here! The kids are back to school and the leaves are changing.
This will be the last year I get to scrapbook about "BTS", next year, she's off to college!

I used a glossy card stock for the background, I have quite a few colors in my secret stash, and printing on them would be impossible if not for the Perfect Crafting Pouch. I'm also a huge fan of texture, fabric leaves and flowers and GLITTER! This layout has it all. I'm so happy that The Best Glue Ever! stays tacky after it dries, it's PERFECT (no pun intended) for applying fabric flowers, leaves and ribbon. It won't soak through the item and you don't have brads going through your layout that get caught up when trying to slip them into the album.

Use the Perfect Cleaning cloth to clear up any tacky areas that you don't want tacky and to eliminate static electricity when using glitter.

SUPPLIES:
The Perfect Crafting Pouch, The Best Glue Ever!, The Perfect Cleaning Cloth (ScraPerfect)
Autumn Stripes glossy card stock (Murdock Country Creations)
Computer, printer, .doc file (see below)
Gold embossing powder
red fine art glitter
fabric fall leaves
Baer paint chip
Dark Distressed Red card stock, gold glitter alphabet (The Robin's Nest)
Transparency film
Sewing Machine w/ Red thread
Plantin Schoolbook Cricut Cartridge (cut at 2 3/4" Bold)

First, I created a word processing document with a photo block and flourishes (image at the end of this post for your reference) and applied the Perfect Crafting Pouch to the glossy card stock before printing the document. **If you can adjust how much ink to use on your printer, lessen the ink output. When it's done printing, dump the embossing powder over the wet ink and heat emboss. Let cool completely. Apply the Perfect Crafting Pouch again over the embossed areas then add detailing w/ The Best Glue Ever! and apply the red glitter, dump excess and let dry completely before cleaning the layout with the Perfect Cleaning Cloth. Adhere photo in place, slip the paint chip behind the upper left corner of the photo. While you are waiting for the glittered glue to dry, you can apply some squiggles of glue below the photo at this time, so it will also be dry at the same time and you can place your leaves.

Cut the large BTS letters, the name is printed on transparency film, the dates are stickers.
Assemble the title block. Use a small amount of glue behind the letters on transparency, then sew lines with red thread horizontally to secure edges.

Thank you for stopping by the blog, I hope you enjoyed this project.
Please become a follower and be inspired with every post, and possibly win some blog candy :o)

TODAY'S BLOG CANDY!!!


LEAVE A COMMENT HERE FOR A CHANGE TO WIN ONE PERFECT CRAFTING POUCH!

Scrap On!
Becky

Below are more ScraPerfect products that will be given away on a other post.

Tuesday, August 16, 2011

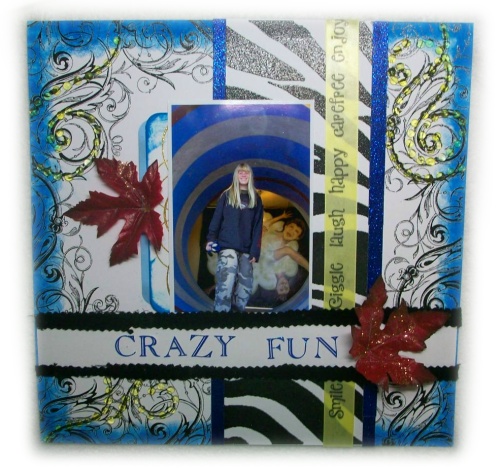
Robin's Nest: "Crazy Fun" Scrapbook page


Hello!! This is my Robin's Nest Design Team Project for this week.


I'm so excited about this crazy layout!

This photo of my daughter in the Fun House at the Fryeburg, Maine Fair just screamed "Crazy Fun" layout. I started with black and white then pulled red, blue and yellow from the photo with ink and embellishments. It IS a little crazy, but I love the way it turned out!

Robin's Nest Supplies:
Black and White Swirl Paper
Blue glitter Chipboard
Zebra paper
Pink Coral paper (back side for tag for journaling)
Gold Glitter journaling block
Yellow small Dew Drops from Sunflower Collection
Black velvet ribbon
Dew Dew Glue
Blue Glitter Alpha

Other supplies:
Adirondak Sail Boat ink and pounce applicator
Yellow Ribbon printed on PC w/ .doc file
fabric leaves
White cardstock
Adhesive

Thanks for stopping by!
Be sure to visit the Robin's Nest Blog for more ideas and inspiration.

Cheers!

Becky Conley

Tuesday, August 2, 2011

Robin's Nest: "Dresden" Scrapbook Page


In 2003 I took a girl trip with a group of wonderful lady friends to Dresden, OH to visit the Longaberger Homestead! Good times. In this layout, I made my very first basket inside the Longaberger factory (with lots of assistance from this nice gentleman employee and tour guide). I was so proud of myself :o)

SUPPLIES:
Robin's Nest Papers: (YES! I USED 6 PAPERS ON THIS LAYOUT!) Olive Stripe, Black and White Pine (back-hunter green), Girl Swirl Stripe (back beige w/ copper swirls), Autumn Leaf, Daisy Stripe Rain Forest, Brown cardstock w/ copper Flourishes,
Other Robin's Nest items: Dew Drops, Copper Glitter Alpha, Dragonfly rub ons, dew dew glue

Other: EK Success corner punch, corner rounder punch, Green ink, dimensional foam adhesive,
PC to print journaling block.

I used green ink to alter the background color of the copper flourish paper and on the left upper side as well as the alpha letters. I glued a small piece of the hunter green cardstock from the back of the Black and White Pine paper behind the punched area of the title block. The large dragonfly was rubbed onto a beige scrap from Girl Swirl Stripe paper then cut out and adhered with foam adhesive.

I think that's all my tricks for this layout :o) Feel free to ask questions, I'm always open to chatting about being crafty LOL.

Be sure to follow the Chattering Robins Blog for more inspiration throughout each month.