
Welcome Crafty Peeps!
This is my post for consideration to join the May Arts "Ribbonista" Design Team.
As all of my readers are aware, I create and design a myriad of artful mixed media projects, paper crafts and home decor items. I am a paper addict and rarely create anything that does NOT have ribbon :o)
May Arts has an extensive collection of many stylish and trendy lines.
I have posted 2 projects here and the third will be live on my blog Thursday, June 14th with a sneak peek image at the end of this post.
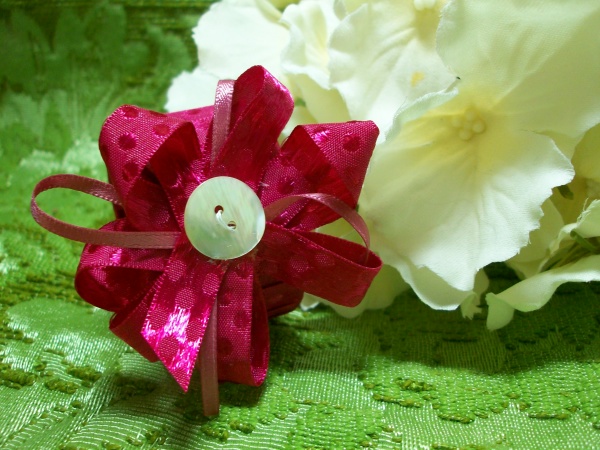
Starting out small with a "green" crafted floral napkin ring.

SUPPLIES:
Empty toilet tissue cardboard center
2 yards of ribbon 1/4 or 3/8 ribbon
1/2 yard thin ribbon
button
needle/thread
super sticky tape
scissors
STEP 1

1. Cut the toilet tissue tube into three rings approximately 1".
STEP 2:

2. Apply super sticky tape around the outside, remove backing.
STEP 3:

3. Begin on the outside and wrap the ribbon around the cardboard. I suggest starting and ending on the outside because you can secure the area with your embellishment and it will not interfere when you put it over napkins.
STEP 4:

4. Continue wrapping until the entire cardboard is covered, end on the outside.
STEP 5:

5. Make a flower embellishment by looping the ribbon back to the center where you sew with needle and thread. Begin the flower with both the wider and thin ribbon. Twist and loop randomly for fullness until you reach your desired flower size. Knot the thread on the back.
STEP 6:

6. Attach a button the front center, this will help secure the ribbon as well as embellish.
Knot the thread on the back.
7. Hot glue the flower to the napkin ring where the wrapped ribbon ends.
I hope you enjoyed this project! Just imaging your color choices with May Arts Ribbon, you can customize any special event.
My second project is a 16x20" mixed media collage on canvas. I have not included step-by-step for this project because collage has a way of evolving and changing that takes many steps :o)
My vision for this project was the "ladder" of ribbon climbing up as where my head is when I "DREAM", hence the title.

This project includes many mediums and techniques. To name a few: decoupage, acrylic paint, ribbon, heat fuse thread, rubber stamping, alcohol markers, color wash, stenciling, detailing with markers and glitter. The title is chipboard black glitter letters.
My third and final project is a vibrant piece of wall art created for the Purple Cows.
Step by Step instruction and material list will be live here: www.beckyconley.blogspot.com on Thursday, June 14th.


Thanks bunches for stopping by, I hope you enjoyed the projects and have become inspired to create your own works of art with ribbon.
Ribbon is also wonderful for paper crafting. If you would like to see more projects with ribbon; follow these links:
Blog Hop for Robin's Nest: converted a mini book kit into wall art using ribbon
Floral wreath redeux for the Designer Crafts Connection blog hop: 1st Monday of each month
Ribbon on scrapbook page
Paper gift box with ribbon pull for lid
Owl sachet
Scrapbook page: ribbon, clay, paper
Scrapbook page, wired/wide ribbon
Hybrid mixed media wall plaque
Craft on!
Becky
No comments:
Post a Comment